Tampilkan postingan dengan label valve job. Tampilkan semua postingan

Rabu, 26 November 2014

Checking an engine after head gasket failure


Engines can have head gasket failure in two ways:
  • They can leak oil or coolant onto the ground, with no internal failure
  • The fire ring seal can fail, allowing combustion gases to pressurize the cooling system

Of those two failures the second is by far the worst because it’s usually associated with overheating and sometimes catastrophic engine failure.  The common dealership repair is usually to slap a new head gasket in place and send it down the road.  That works for some engines.  But on others, the result is a repeat failure – a month, a year, or three years later. 

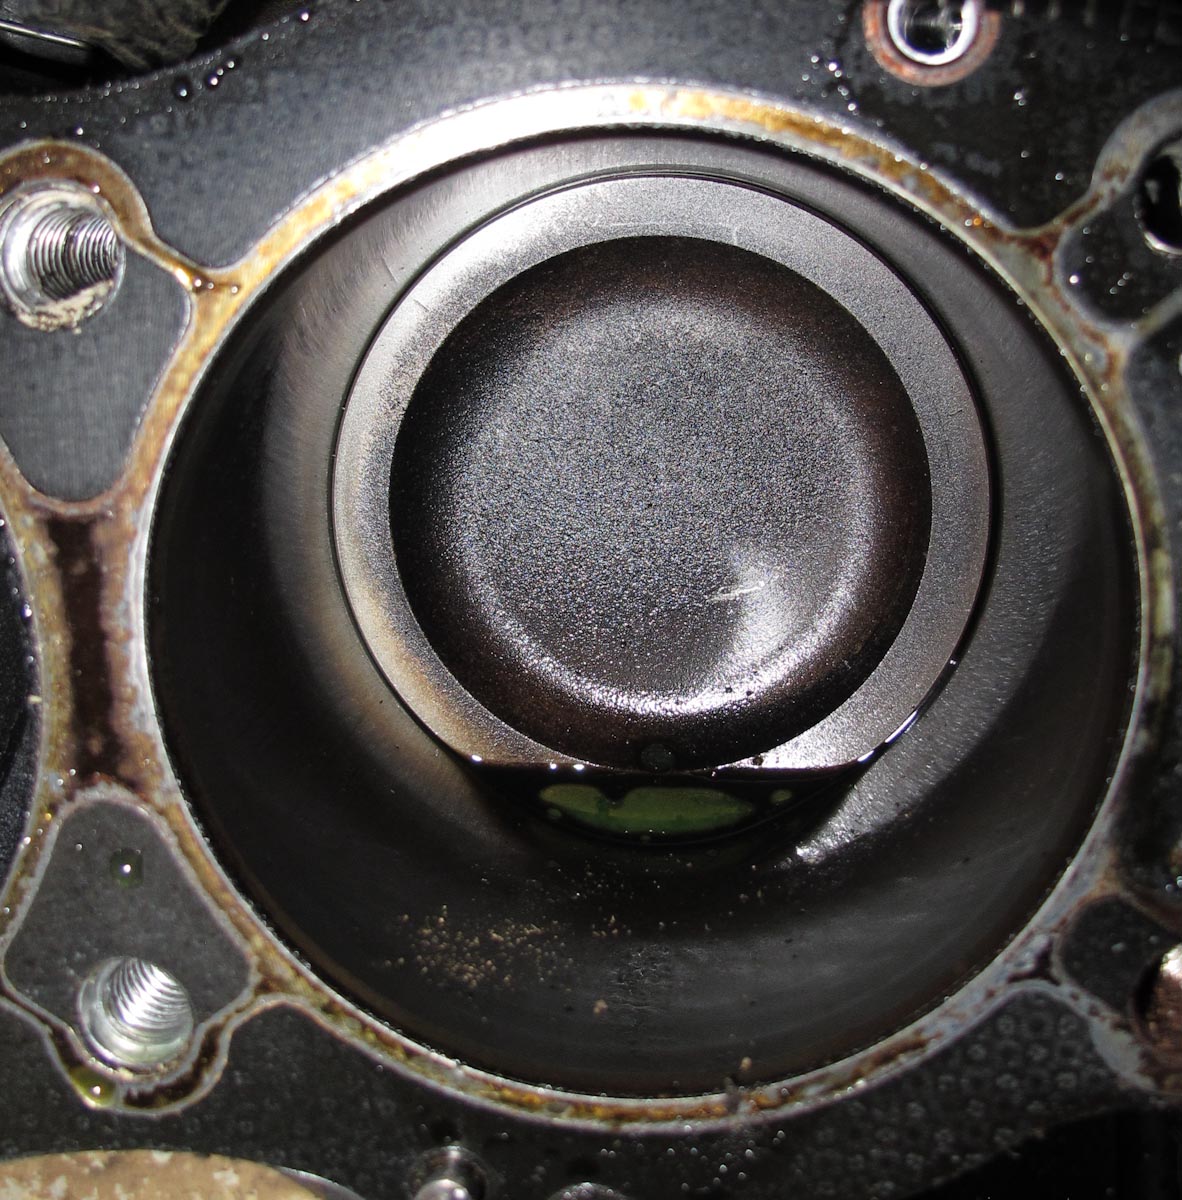
A blown head gasket. Area in the red box is the coolant passage.  The half circle is the combustion seal 
Most of the cars we see are in this latter category.  For example, we get quite a few Land Rover engines that have a “history of head gasket replacements.”  No engine should have repeat head gasket failures.  When that happens, some repair step is being skipped, or there’s another root cause. 

Almost every engine we see needs some additional machine work when the heads come off.  That makes me wonder if the shops who are just slapping in a new gasket are ignoring that and trusting luck, or if we just see the “repeat offenders” because we are more a shop of last resort when the local mechanic could not fix the car.

How can you tell if a gasket alone will fix your problem?  You measure.  Read on, and I’ll show you how we check for problems and what we do when we find them. 

The first things we do are tank clean the head, and then blast it with walnut shell grit to get it as clean as new. Next we measure the head for flatness with a straight edge.  When aluminum heads are removed from an engine, they are usually slightly out of flat.  In addition, they can be corroded.  Sometimes we see damage from coolant gone bad, and we occasionally have to weld that up.  We also see cracks on some engines.  Cracks are typically repaired by welding too.  When all that is done, the surface of the head is machined flat.  If the engine is a V6, V8, or V12 we surface both left and right heads equally so as not to cause a compression imbalance.


Repaired cylinder heads for a Bentley (c) J E Robison Service

If an engine has more than 75,000 miles the heads will always benefit from freshening up.  In that, we reseat the valves, check the guides and fit new seals, and clean the ports. We check for valve seat damage, which will lead to burnt valves.

A burnt valve as seen in the head (c) J E Robison Service
Burnt valve removed from the head (c) J E Robison Service
If the owner wants his engine blueprinted we will also measure each combustion chamber’s volume and increase the size of small chambers to match the volume of the largest chamber.  This is typically done by grinding material away and by recessing the valves deeper into the seats.

The heads are the easy part.  Now we check the block.  We use a straightedge to measure the deck surface for flatness.  Sometimes we find broad warping, while other times we find depressions or valleys.  The head gasket can take up a few thousandths of warp, but a block with 5 or 10 thousandths has to be taken apart and repaired.  The reason:  major warpage of the deck often means the bearing journals are warped too, and if that is ignored the engine will have a lower end failure at some point.

Significant deck warping is a sign of major overheating. 

Illustration of a low spot in an aluminum block deck (c) J E Robison Service
The next thing we look for is out-of-round in the cylinders.  We measure the cylinder bore front to back, and inside to outside.  The difference between those measurements is called “egging.”  We don’t want to see more than .002 inch.  More than that and the piston rings won’t seal well, and the engine will use oil and possibly lose compression.  Egging is another sign of overheating.

We also make those measurements at the top and bottom of the cylinder.  Again we don’t want to see more than .002 difference.  Top to bottom difference is called “taper.”  When a motor has too much taper it may know, and that’s a sign it’s worn out.


Measuring cylinders for taper and egging, BMW V8 shown (c) J E Robison Service
Finally, we test the studs or the head bolt threads, particularly on aluminum engines.  We look for evidence of stripped or pulled threads, and we repair any damaged ones with inserts. An insert repair will be stronger than the original in most cases.


Repairing damaged head studs with oversize inserts Bentley V8 shown (c) J E Robison Service
If the block is out of spec in those areas it should be removed and overhauled.  We can fix dimensional errors like that in most cases.  The other thing we look for is corrosion damage.

If you think this sounds like a lot of work compared to slapping in head gaskets, you are right.  The gasket slap is a strategy for dealerships working on factory warranty (where it just has to last to the end of warranty . . .) and new cars (where corrosion and wear are seldom issues)  If you work on older vehicles, or if you want your repairs to be at least as good as original (as opposed to almost as good as original) this is the only path to take.


Quality engine work takes time, and costs money.  Jobs done correctly last, and the price is soon forgotten while poor quality never goes away.  


If you're wondering what's below the heads, read this story about liner failures in Land Rover V8's and how we fix them.

Good luck
John Elder Robison

Robison Service has provided independent service, repair, and restoration for BMW, Land Rover, Jaguar, Mercedes and Rolls Royce -Bentley owners all over New England for over 25 years. Founder John Robison is a long time technical consultant for the Rolls Royce and Bentley Owners Club. Our company is an authorized Bosch Car Service Center. We also service Mercedes, Jaguar, Land Rover, Porsche, and MINI motorcars. We have flatbed transport throughout the northeast region, and we work with Intercity and other transporters for greater distances. We also offer pickup and delivery for cars in  Springfield, Wilbraham, Longmeadow, Agawam, Westfield, Northampton, and Amherst.

Kamis, 20 Februari 2014

Blown Head Gaskets on Land Rover V8 Engines

I've got a blown head gasket in my Land Rover.  What will it take to fix it?  That's a question Land Rover service managers hear fairly regularly.  We used to do head gasket jobs all the time, but in the last 5-7 years many of those jobs went bad. Many shops won't even do LR valve jobs anymore.  Why?

This is a big issue for people with the original LR-Buick aluminum V8 engine - all the US market Defenders and Range Rovers to 2002 and Discovery I and II models through 2004.


The engines overheated and failed either right after the head gasket job, or within a few months.  At first I thought the failures were comebacks - errors of workmanship.  But I soon realized the problem was not the workmanship - it was the motors themselves.  They were failing internally, in seemingly invisible ways.

Join me now as we look closely at a seemingly simple head gasket failure, and find there is much more to the story . . . 

This 2001 truck came into Robison Service a few days ago (early 2014) with a noise complaint.  Exhaust gases were blowing out between the head and the block.  It seemed like a classic case of fire ring failure in the head gasket.  In years past, I'd have been right on it with new head gaskets and a cleaned up heads.  Today, not so quick . . . As it happens, our caution turned out to be well founded.

Here are both heads off the motor.  As clearly shown, only one has a blowout (second cylinder from the left, upper head)  So far, it looks like a blown gasket.


OK, now lets look at a closeup of the failed cylinder in that upper head.  The blowout line is in the center.  Look at the holes for the head bolts.  The one on the left is actually facing the front of the engine, as you are seeing the head upside down (we will look at that hole in the block in a minute)   Note how its orange from coolant intrusion.  The one on the right (the rear bolt hole) is clear and that’s what you want to see.

The orange is sedimented Dex-cool.  Sedimentation is a known issue with Dex cool and it's particularly visible here.  It looks very different from freshly spilled coolant, like you get from teardown.  Scroll down the page four more images and you'll see freshly spilled coolant in a head bolt hole.  There's no mistaking the difference.

There are some motors where the head bolt holes go into the coolant galleries.  This isn't one of them.  These holes should be dry.  The fact that they are not suggests a crack or leak somewhere.

The blowout has damaged the head slightly but it's nothing we can't fix with a weld and resurfacing before the valve job.  Right now, that is the least of our worries.


Like I said, that dried coolant is a bad sign.  There are no coolant passages from block to head in the middle cylinders of a Rover-Buick V8.  There is no connection between the head bolt holes and the coolant galleries in the block, either. That area should never show coolant.  It's a bad sign, suggestive of internal failure.  But there's more . . . 

Now lets look at the block on the right side.


The blowout is clearly visible in the bottom of the second cylinder back.  Note the rectangular marks at the left and right edges of the block.  Those are the passages through which coolant flows into and out of the head.  There is no coolant flow through the middle.

The reddish spotting between 1-2 and 3-4 cylinders and the respective lower head bolt holes is even more suggestive of slow coolant leakage.  We will look at that in closeups.  When you look at the second and fourth head bolt holes from the left, those are dark.  The other holes are light, meaning no long term coolant intrusion.

This is a closeup of the lower head bolt hole and the edges of cylinders 1-2 on that side.  Note the pattern of leakage from the liners in toward the head bolt hole. See the “burnt” coolant in the bolt hole.  Those are sings of long term seepage.  This usually indicates a crack emanating from the bolt hole out to the liner faces on 1-2.  Also note the pattern of leakage continues onto the surface of the front piston, which is washed clean of carbon in the same area.  This is a sign of coolant intrusion into the cylinder and its location corresponds to the seepage on the block


For comparison here are the front and rear head bolt holes with a view up to the coolant passages from block to head.  In the rear one you clearly see some coolant leaked in disassembly and the difference between that and what’s dried and hardened in those inner bolt holes in the earlier images  is clear


Here is a top view of the blown head gasket.   There's no damage (other than the blowout) between this gasket and the head.  It's very clean and normal looking.


Closeup of the bottom reveals a different story on the engine block side.  That face makes the leakage pattern strikingly clear, and shows it’s all coming out of the block.  That's not surprising, because it can't come from the head.  There's no coolant in that area!  However, the area between the head bolt bore and the cylinder edges is hollowed out in the casting, for coolant flow.  That is the area that is vulnerable to cracking, and that's what's cracked in this motor.


The leakage traces on the bottom side of the head gasket really tell the story.  The way the gasket is discolored we know the leak has been developing over a long period of time.  What happens is that the crack grows, and as it does, the crack opening relieves the tension on the head bolt. That's probably one of the reasons the fire ring seal blew out.


Here’s a broader view of the bottom of the gasket, where two leaks are visible, to the left and right of the blown fire ring..  

Like I said, five years ago I'd have put head gaskets on this motor and sent it down the road.  And looking at today's evidence - it would have failed because the block was already damaged.  Head gasket leakage was a symptom of that failure, not the actual problem.  It may have lasted a week; it may have lasted six months.  Either way, it would have blown.

Here's a photo of a stripped engine block, after we cut it in half and circled the crack that made it fail.  The coolant passages are clearly visible


What do we do now?

The correct fix will involve removal of the liners, welding the cracks, and then fitting liners with flanges at the top, so that the liners will seal agains the head basket and coolant will not be able to go between block and liner and cause a blowout.

Read more about that in this article from 2012.

As a footnote to this story, when told about these issues, the owner of the truck told me he'd been adding coolant for a while for a period of months.  Now we know where it was going.  The coolant was getting burned in the cylinders as it leaked from the cracks behind the liners.  The fire ring blew out because the block cracks caused the head bolts to lose their clamping force.  We have an explanation for the whole thing, disagreeable as it may be to the one who has to pay the bill.  Still, I contend it's better to know the bad news up front than to discover it after a $3,000 valve job and head repair goes bad.


John Elder Robison is the manager of J E Robison Service, independent Land Rover specialists in Springfield, MA.  Find him online at www.robisonservice.com or on the phone at 413-785-1665

Kamis, 15 September 2011

When engines run too fast, or too lean . . . valves break

Last week, we received a 1990s Range Rover Classic that ran rough and made some noise.  A local garage had changed the plugs and wires, to no avail.  They did a compression test, and found one dead cylinder, with 25 PSI compression.  A normal reading on a truck like this is 175.  That's when the owner decided to ship the rig to us.

We did a leak down test, where we put air into the cylinder through the spark plug hole, to see where it comes out.  Air came out the exhaust as fast as we put it in.  There was only one thing to do - we pulled the head.


We found just what I expected - a burnt exhaust valve.  You can see the two valves in the cylinder head photo above.  The intake is on the left; exhaust on the right.  See the ragged edge on the right side of the exhaust valve?  That's the failure.  Here's the valve, removed from the head:


In this photo the failure is unmistakable.  That was where the story got complicated.  The owner said, "The engine only started skipping after I got the truck back from having a new transmission installed."  I asked why he had the transmission changed.  "It stopped shifting gears," was his reply.  "It stuck in low."

I decided to look at little closer.  Look real close at this photo of the piston.  Note the little line just below center right:


It looks to me like the valve touched the top of the piston, ever so slightly.  BTW, the liquid in the cylinder is residue from disassembly.  It has nothing to do with the repair.

I thought about what the owner had said, and I concluded one of two things must have happened.
A - He ran the engine too fast because the transmission was stuck. As a consequence, the valve "floated" and hit the piston, causing it to fail
B - The engine was racing way too fast with a light load because the transmission was stuck.  As a result, it ran too lean, and the lean running caused that cylinder to overheat because its injector was a little marginal.

I don't know which explanation is correct, and of course one of you readers may suggest something totally different.  For now, I am going to use my best judgement and recommend we change that injector, and fix the valve.  Changing the injector covers both the bases for us.  The trans repair took care of the over-revving, and the injector will take care of possible leanness in that cylinder.

As you can see, there is no sign of damage on the cleaned up piston:


The valve looks just as fried as ever.  We'll fit a new one, and new springs just to be safe.  We will also touch up the valve job on all the other cylinders and clean up the seats.


If you go back to the top photo, you'll see there was black carbon all over the valve.  What does that tell us?  It says someone tried to drive this truck a ways with the failed cylinder.  That suggests it may have failed earlier than the owner thought.  However, it does not change the diagnosis.  

Is there a moral to this story?  I think so. When your car starts to fail, or act at all unusual, park it.  Don't drive it home and then say, "it sounds funny."  By the time you get there, it may be too late.  This fellow started with a transmission repair, but when he kept driving, it became an engine repair too.

In his defense, I must say that we see this all the time. Modern cars have loud stereos and lots of sound deadening around the motor.  Most of the lights and gauges we had 20 years ago are gone.  It's easy to drive today's vehicles until they go up in smoke, and then ask ourselves, "How did that happen?"

As owners (I am an owner too, not just a repair guy) we have to be extra observant because the sounds and smells that used to warn of danger are no longer there for us to see, unless we look real close.  Check your fluids every now and then, and if you ever feel something may be amiss, slow down, open a window, and listen and smell.  It it ticking?  Does it smell hot?  Is that gauge pinned in the red?

In the end, if our cars fail, we pay the price.  So it pays to be vigilant.